
Earlier this year, I finally committed to the fact that I love working in ceramic clay and it was time to be a grown up and set up my own studio at home. I had been working at Lewis Snyder’s Studio S (StudioSPottery.com) for the past 5 years doing hand building. My good friend, Kay Currie, was my instructor. I had reached a point though that I was no longer satisfied with only doing clay 2 hours a week. I find when I work with clay I really get lost in the work.
My husband and I discussed it and we went in search of a kiln. At the point of making this decision, I also realized I had never even fired a kiln, let alone my own kiln. I also didn’t know what clay body I wanted to work in – there are 100s. The luxury of Studio S was that the clay/glazes were provided and all the firing was handled by someone besides me. Needless to say, I had to dive into some intense independent study of additional clay education in order to fully equip myself. I mean glazes??? What kind and what fire – low or high? Colors and the chemistry, oh my sweet lord!!!
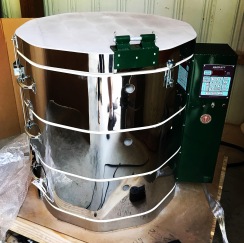
Lewis helped us purchase a great kiln (Olympic MAS2327), and I went to work setting up my “clay studio” and equipping myself with all the peripheral supplies I needed to get in place. From, tools to forms to glazes and a place to wedge clay. I discovered the amazing mecca of clayness that is Mid South Ceramic Supply in Nashville and The Clay Lady Studios (MidSouthCeramics.com). Every single person there is absolutely amazing and so helpful. They really took time to answer all my questions. They had nearly everything I needed to get my studio stocked up.
My kiln took 7 weeks to be built, she is beautiful and was worth the wait. I named her Brigid after the Celtic Goddess of Fire. We had to reassemble her on her base and add venting when she arrived. I also spent the 7 weeks that I waited for her to arrive, building pieces to fire, educating myself, attending a couple workshops and doing research.


I decided to work with low fire red clay and attended a wonderful two day workshop at Mid South Ceramic called “Red Handed Symposium” and also finally took a workshop from the amazing clay artist, Nelson Grice, in Birmingham, AL on how to do image transfers on clay.
 I purchased a table top pottery wheel and am a long way from mastering throwing, but I will tackle that and get the hang of it. Practice, practice, practice on that one. Though I was able to throw a couple pots with the help of my friend, Kay.
My first batch of bisque is glazed and I will load up Brigid this week and put the final glaze fire on the work. That is when it all comes together. It’s like a science experiment with lots of variables and you only really know how the study works when you pull it out of the kiln after the glaze firing. I will let you know how it turns out.


Amazing work, even in the not yet finished phase. A great read on how to approach learning anything new.
LikeLiked by 1 person
Amazing work!
LikeLike
Love your work. Do you have a newsletter?
LikeLike